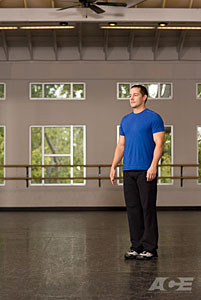
Quick Shot: Forward Lunge, Mountain Climbers, and Front Plank
Want to build strength and test your endurance without ever hitting the gym? Quick Shots are a series of exercises that you can do on your lunch break, in between clients, or at the end of the day in the comfort of your own home.
Today, we’re learning how to do forward lunges, mountain climbers, and front planks. Remember to keep your “belly button to spine” throughout the exercises. You want your abs to be tight and engaged!
Forward Lunge
Target Body Part: Abs, Butt, Hips, Thighs / Equipment Needed: None / Level: Intermediate
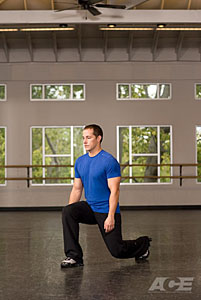
Step 1. Start by standing with your feet together. Pull your shoulder blades toward your hips and engage your abdominal muscles (aka, your “core”) to stabilize your spine.
Step 2. Slowly lift one foot off the floor and find your balance on the standing leg. Pause for a moment while keeping your standing foot steady. Then step forward so that your raised foot lands heel first. Slowly shift your body weight to the lead foot and place it firmly on the ground. As you shift your body weight, avoid the tendency to tilt or sway your upper body, and try not to move the lead foot. (Click on the image to the left to see the position.)
Step 3. As you step forward into the lunge, focus on a downward movement of your hips toward the floor. Avoid driving your hips forward. This motion will you help control the forward movement of your shinbone over your foot. Continue lowering your body to a comfortable position or until your front thigh becomes parallel with the floor and your shinbone is in a slight forward lean. During the movement, slightly bend forward at your hips. Keep your back straight.
Step 4. Firmly push off with the front leg, activating both your thighs and butt muscles. Return to your upright, starting position. Continue, alternating your lead foot, for one minute. Then repeat two more times, for a totalof three one-minute sets.
Andrea’s Note: I suggest that you first learn how to perform single leg stands before performing this forward lunge. Once you master the forward lunge, you can progress to doing a lunge using arm drivers and multi-directional glute activation lunges.
Mountain Climbers
Target Body Part: Butt, Hips, Thighs, Full Body / Equipment Needed: None / Level: Advanced
Step 1. Come to a hands-and-knees position on the floor with your toes pointed toward the floor. Your hands should be slightly ahead of your shoulders and your fingers should be pointing forward. Bring your left foot forward and place it on the floor under your chest. Your knee and hip are bent and your thigh is in toward your chest. Lift your right knee off the ground, making your right leg straight and strong. Your right toes are tucked under, heel up. Brace your abdominal muscles to stabilize your spine. Pull your shoulder blades down and back.

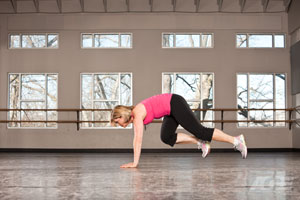
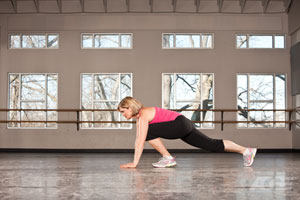
Step 2. Keeping your hands firmly on the ground, your abdominals engaged, and your shoulders strong, jump to switch leg positions. Both feet should leave the ground as you drive your right knee forward and reach your left leg back. Now your left leg should be fully extended behind you and your right knee and hip should be bent with your right foot on the floor. Continue, alternating your front foot, for 45 seconds. Repeat two times, for a total of three 45-second sets. (Click on the image to the left to see the positions.)
Andrea’s Note: If you have limited range of motion in your hips, place hands on a step or platform. Make sure to keep your weight evenly distributed on both legs. Do not shift all your weight forward into your front foot.
Front Plank
Target Body Part: Abs, Back / Equipment Needed: None / Level: Intermediate
Step 1. Starting Position: Lie on your stomach on an exercise mat or floor with your elbows close to your sides and directly under your shoulders, palms down and fingers facing forward. Engage your abdominal muscles (aka, your “core”). It should feel like you are tightening a corset around your ribs, waist and lower torso. Contract your thigh muscles to straighten your legs strongly and flex your ankles, tucking your toes towards your shins.


Step 2. Upward Phase: Slowly lift your torso and thighs off the floor or mat. Keep your torso and legs rigid. Do not allow any sagging in your ribcage or low back. Avoid hiking your hips into the air or bending the knees. Keep the shoulders away from the ears (no shrugging). The shoulders should be directly over your elbows with your palms facing down through the entire exercise. Continue to breathe, keeping your abdominal muscles strong while holding this position. Try holding this position for five seconds or more. (Click on the image to the right for an example.)
Step 3. Downward Phase: Keep the torso and legs stiff as you slowly and gently lower your body back towards the mat or floor. Continue, repeating each phase, for one minute. Repeat two more times, for a total of three one-minute sets.
Andrea’s Note: If you experience any pain in the low back with this movement, stop the exercise immediately and restructure your form.
For personal training in the Vista, Carlsbad, and San Marcos area, call Andrea Tagalog at (888) 347-6852. Before beginning any fitness program, always see a qualified healthcare provider for advice and to address any questions or concerns. The exercises presented on this website are for suggestion only and should not be substituted for medical diagnosis or treatment. Participate at your own risk and stop if you feel faint or experience shortness of breath.